... since my last post. Surprised, huh? I know I am! Although, I suppose a week and a bit in blogland can seem like a long time.
I made the following card for a friend of mine in Canada. And it really has been like FOREVER since I sent her something to remind her that she is in my thoughts and heart. I was thinking how easy it has been for so much time to pass by in the whirligig of every day and, in that time, not reach out to those that I care about - especially those who may be far away. Definitely time for redress...  Stampin' Supplies
Ink:
Always Artichoke
Chocolate Chip
Old Olive
Soft Suede
VersaMark
Stamp sets:
Defining Alphabet
Vintage Vogue
Cardstock:
Always Artichoke
Naturals Ivory
Old Olive
Accessories:
Chocolate Chip Grosgrain Ribbon
Earth Elements Brads
Old Olive Grosgrain Ribbon
Rich Regals Brads
Soft Suede Polka-dot Grosgrain Ribbon
Sponge Daubers
Stamp-A-Ma-Jig
Stampin' Dimensionals
Saturday, May 15, 2010
It hasn't been forever ...
Thursday, May 6, 2010
Not A-Mused
I've really struggled for a few months to get back into papercrafting. As one of the sweet people who have visited my blog, you would have noticed that the frequency of my postings has declined drastically. Initially, after Christmas, I had attributed the lack of interest in things crafty to a little burnout ... and consoled myself with gaming in the hope that the passion for creating would build up like forest litter waiting for ignition by lightning or, possibly as a worst case, a passing firebug. But, alas, no such conflagaration has eventuated and the fire danger rating is sitting on "No Great Need to Worry".
It finally dawned on me, about a month ago, that my Muse must have absconded after I overworked and neglected her during that Christmas period. I've been imagining her flitting from country to country, enjoying the sights and sounds of novel surroundings while gifting the odd local with some inspiration to add a masterful new ingredient to an existing speciality or, perhaps, injecting new life into a tired artist's caricatures of willing tourists. I imagine her ending up in Tuscany, holed up with a poor yet talented writer - sharing cheese, olives, wine and ciabatta ... and exhorting him to finishing that one manuscript that will make his career! Of course, it would be published first in Italian and I would have to wait for the English translation to really appreciate the end result. *grin*
I think that she may have paid me a little visit when I made the following card as it took several hours to complete and I didn't notice the time passing by. I'm dedicating the card to my Muse and to Muses in all their forms ... for if you do love your Muse (like life), I expect that they will love you back.  Stampin' Supplies
Ink:
Certainly Celery
Old Olive
Orchid Opulence
Rich Razzleberry
VersaMark
Stamp sets:
Cottage Garden
Paper:
Certainly Celery CS
Cottage Wall DSP
Old Olive CS
Orchid Opulence CS
Rich Razzleberry CS
Whisper White CS
Accessories:
1/16" Circle Punch
Eyelet Border Punch
Rich Razzleberry Polka-Dot Grosgrain Ribbon
Sizzlits Buttons #5
Stampin' Dimensionals
White Embossing Powder
Thursday, March 4, 2010
On bended knees
I am typing this post while kneeling at my computer. Why you may ask? OK - other than the really obvious need for forgiveness for neglecting my blog, I've just read that sitting down is the new smoking! A study has
...found that for every hour that a person spends sitting..., their individual risk of death from all causes rose 11 per cent, their risk of death from cardiovascular disease rose 18 per cent and their risk of dying from cancer, 9 per cent.
I'm really surprised that I'm still here after those statistics. Given how much I've been sitting all these years, I'm pretty sure that the risk from all causes would be pushing 100% (albeit at an ever decreasing rate). Also, given how my knees are feeling already, I'm sure that knee replacement surgery is now on the cards.
Anyway, I thought I would try making a whole card while standing up1 just to see how tricksy it would be to avoid this sitting health hazard going forward. Here it is:
 Stampin' Supplies
Ink:
Brilliant Blue
Chocolate Chip
Old Olive
So Saffron
Stamp sets:
Good Friend
Simply Said
Paper:
So Saffron CS
Tall Tales DSP
Whisper White CS
Accessories:
Circle Scissors Plus
Rose Red Double Stitched Grograin
Sponge Dauber
After that experiment, I can honestly say, "I can't stand it!" Oh noes! Is that a varicose vein I see appearing?
1. Most demonstrators are probably adept at demoing cards standing up BUT who would choose to design a card doing so? Yeah .. thought so ... who's quite that crazy, hey? Doh! Me apparently.
Monday, February 1, 2010
Goodness! It's February already!
Oh no! This blog has no entries for January 2010. I can imagine in the far distant future, in a dark post-apocalyptic setting where people will be using stamp pads for make-up and wooden stamp blocks for firewood, a copy of this blog will be discovered by the accidental activation of back-up server in a mostly destroyed Google disaster recovery centre. People will only find fragments of this blog from 2010 and incorrectly deduce that there are only 11 months in a calendar year - all because of me!
Totally unlikely, hey? SIF1 anyone would burn their stamps...
I have been very badly distracted during January (that's right, people from the future - we have 12 calendar months). After the pre-Christmas creative binge, I fell back into an old love-hate relationship that I have with a PC game called Counter-Strike: Source. Mainly played by male gamers, a CSS session is usually fuelled by huge doses of testosterone (and hence, swagger, swearing and raging) - so much so that I'm really starting to miss genteel female company! To try to get back into the crafty swing of things, I took part in this month's INKlings Cyberstamp hosted by my upline, the wonderful Jayne Mercer. Her first challenge was to create a flower using punches. Stampin' Supplies
Ink:
Kiwi Kiss
Riding Hood Red
Stamp sets:
Stem Sayings
Paper:
Sweet Nothings Simply Scrappin' Kit
Whisper White CS
Accessories:
Butterfly Punch
Heart to Heart Punch
Trio Flower Punch
Having not made anything in a rather long while, I really struggled to appreciate the aesthetics of this card when I finished it. Is it good, bad or just ... as CSSer's would say... meh?
1. SIF: CSS for "as if". As in, SIF you headshot me while blinded
Monday, December 7, 2009
Telling Tall Tales
OK I've been sprung! I gave a half-hearted undertaking that the notebook for Jillian would be the last one that I'd post for a while but I truly couldn't help myself. When I recently opened up my pack of Tall Tales DSP to cut some samples for my team and myself, I saw the little zebras riding aloft on their striped balloons and I just had to use it to make something for my nephew Shi Wei's birthday. As it turns out, it was a notebook and here it is: Stampin' Supplies
Ink:
Chocolate Chip
Stamp sets:
Hello Again
Paper:
Chocolate Chip CS
So Saffron CS
Tall Tales DSP
Whisper White CS
Accessories:
2-Way Glue Pen
Bone Folder
Paper Snips
Sticky Strip
I used the Quickutz Katie font for his name.
My auntie Kim recollected an exchange that she had with Shi Wei the last time she visited. Whenever he was asked what he did at pre-kindy, he would coyly reply "Nothing". My aunt's attempts to coax more out of him with a "You can't do nothing all day at pre-kindy!" would be met with a laugh from him followed by an enigmatic smile.
I suspect that this evasion may be due to his realisation that anything he likes can be withheld if he misbehaves! But I digress...
So, my aunt laid a rather clever trap for him with a tall tale in the following conversation:
Auntie Kim: Shi Wei, what did you do today at pre-kindy?
Shi Wei: Nothing.
Auntie Kim: Well, I know what you did because I came to see you.
Shi Wei: But I didn't see you there!
Auntie Kim: I was hiding behind the fence and I could see you but you couldn't see me. I saw you singing.
Shi Wei [surprised]: Oh!
Auntie Kim: I saw you running.
Shi Wei [even more surprised]: Oh!
Auntie Kim: I saw you playing.
Shi Wei [crestfallen at being found out]: Oh!
Poor little thing ... after that, he's an open book ... when it comes to pre-kindy activities at any rate *grin*
Friday, December 4, 2009
Calendar Class
This 2010 calendar is one of two calendars being made next Friday evening, December 11 at my calendar class. It uses the beautiful Sweet Nothings Simply Scrappin' Kit which is part of the Christmas Extravanganza promotion.
There are also products fresh from the new Summer Mini: the lovely Butterfly Print stamp set with co-ordinating Butterfly Punch and the Retro Mix Wheel. We have room for a few more people to attend this class - the cost is $20 and is being held in Padstow at 7:30pm. Bookings are essential as the number of places are limited. All attendees will receive a copy of the new Summer Mini too!
Please contact me to hold a place for you.
Tuesday, December 1, 2009
Gift Card Card Tutorial
Here is a quick tutorial on how to create your own gift card card. The key to everything is really step 4. All the measurements beforehand are just a guide - I added the measurements because I like to have the borders relatively symmetrical but I realise that this isn't everyone's priority!
If you are really organised, you can design your gift card card to co-ordinate with your gift card... 1. Size up your gift card
By my reckoning, the average gift card is 86mm x 54mm [3 3/8" x 2 1/8"]. But you may have a special card to give that isn't even a gift card ... such a club membership card that was handprinted by the local club owner's 12-year-old daughter armed with a printer and a laminator. The main aim of this step is to get a general idea of the dimensions of what you are dealing with.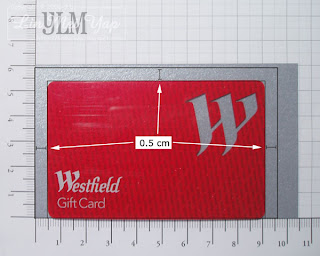 2. Determine the smallest size cardstock required
The great thing about this method is that you really don't have to measure anything but you just have to leave at least approximately 5mm [3/16"] between where the gift card finishes and three edges of your cardstock. The gift card should be flush against the opening which is why you don't have to add a margin to that edge. 3. Clip the gift card to the cardstock
This step is completely optional but I think that it makes things a little easier. I'd recommend you test your clip doesn't leave an unsightly mark if you are not planning on layering something on top of the right side of your backing. Note that the backing is upside down - ie. the opening is on the bottom but will be on the top in the completed project. 4. Apply dimensionals
Cut dimensionals in half and apply them around the gift card as snugly as possible. A snug fit prevents the gift card from moving around. Place dimensionals to support the cardstock where the ones for holding the gift card are too far from the corners. Notice no dimensionals along the opening - obvious but if you follow instructions like me, it's a gotcha!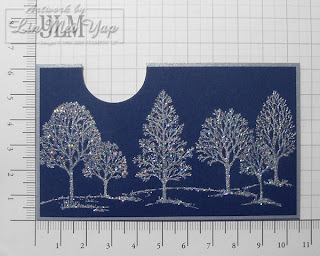 5. Decorate and punch a slot
I mounted my stamped and blinged image onto the backing that I prepared above. Then I used a 1" circle punch to create a semi-circle to make it easier for the recipient to grasp the card out of its holder.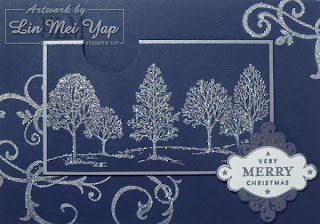 6. Mount onto card
Remove the dimensionals backing and mount the gift card holder on your card. I also added my sentiment to my card at this stage.  7. Insert gift card and secure
This is actually an important step. Nothing holds your gift card in the pocket that you created - so it could slide out quite easily. In my original version of a gift card card, I used a ribbon to hold the card in place. In this more masculine one, I slotted in the gift card and inserted a Designer Brad at the spot shown to keep it secure. And that's it!
Monday, November 30, 2009
Last post for today I promise
... for you ... and for me! Personally, four posts in one day is completely excessive and the only reason I am posting this last one is because I promised to let my newsletter readers know the tips for using the faux metal technique with jumbo brads.
You can see the technique in action as the flower centre on the card that I made for hubby for our anniversary today. There is a close up in the bottom left of the picture. By the way, I highlighted the debossed dots with a metallic silver pen.
So, here are the tips:
1. Use only two layers of black embossing powder - any more and it becomes a gooey mess.
2. Since the brad is metal, it gets very hot when you melt the embossing powder so use tweezers or a clip with a wooden handle to hold it while applying heat.
3. The heat also takes longer to dissipate. VersaMark your rubber and wait a little bit before making the impression - also hold the brad in place for a little longer than normal too.
So, that's it! Tips over and time to spend the evening with Hubby! Have a great night.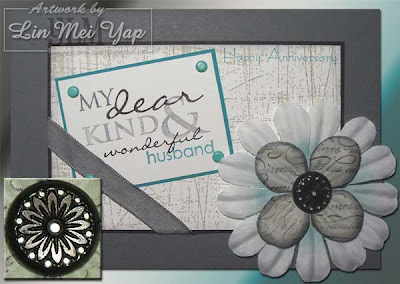 Stampin' Supplies
Ink:
Sahara Sand
Taken with Teal
Stamp sets:
Cheer and Wishes
En Français
Occasional Greetings
One of a Kind
Sanded
Wonderful Favourites
Cardstock:
Basic Black
Basic Gray
Taken with Teal
Whisper White
Accessories:
Basic Gray Taffeta Ribbon
Black Embossing Powder
Heat Tool
Pretties Kit
Sponge Dauber
Stampin' Write Markers in Neutrals


