OK I've been sprung! I gave a half-hearted undertaking that the notebook for Jillian would be the last one that I'd post for a while but I truly couldn't help myself. When I recently opened up my pack of Tall Tales DSP to cut some samples for my team and myself, I saw the little zebras riding aloft on their striped balloons and I just had to use it to make something for my nephew Shi Wei's birthday. As it turns out, it was a notebook and here it is: Stampin' Supplies
Ink:
Chocolate Chip
Stamp sets:
Hello Again
Paper:
Chocolate Chip CS
So Saffron CS
Tall Tales DSP
Whisper White CS
Accessories:
2-Way Glue Pen
Bone Folder
Paper Snips
Sticky Strip
I used the Quickutz Katie font for his name.
My auntie Kim recollected an exchange that she had with Shi Wei the last time she visited. Whenever he was asked what he did at pre-kindy, he would coyly reply "Nothing". My aunt's attempts to coax more out of him with a "You can't do nothing all day at pre-kindy!" would be met with a laugh from him followed by an enigmatic smile.
I suspect that this evasion may be due to his realisation that anything he likes can be withheld if he misbehaves! But I digress...
So, my aunt laid a rather clever trap for him with a tall tale in the following conversation:
Auntie Kim: Shi Wei, what did you do today at pre-kindy?
Shi Wei: Nothing.
Auntie Kim: Well, I know what you did because I came to see you.
Shi Wei: But I didn't see you there!
Auntie Kim: I was hiding behind the fence and I could see you but you couldn't see me. I saw you singing.
Shi Wei [surprised]: Oh!
Auntie Kim: I saw you running.
Shi Wei [even more surprised]: Oh!
Auntie Kim: I saw you playing.
Shi Wei [crestfallen at being found out]: Oh!
Poor little thing ... after that, he's an open book ... when it comes to pre-kindy activities at any rate *grin*
Monday, December 7, 2009
Telling Tall Tales
Friday, December 4, 2009
Calendar Class
This 2010 calendar is one of two calendars being made next Friday evening, December 11 at my calendar class. It uses the beautiful Sweet Nothings Simply Scrappin' Kit which is part of the Christmas Extravanganza promotion.
There are also products fresh from the new Summer Mini: the lovely Butterfly Print stamp set with co-ordinating Butterfly Punch and the Retro Mix Wheel. We have room for a few more people to attend this class - the cost is $20 and is being held in Padstow at 7:30pm. Bookings are essential as the number of places are limited. All attendees will receive a copy of the new Summer Mini too!
Please contact me to hold a place for you.
Tuesday, December 1, 2009
Gift Card Card Tutorial
Here is a quick tutorial on how to create your own gift card card. The key to everything is really step 4. All the measurements beforehand are just a guide - I added the measurements because I like to have the borders relatively symmetrical but I realise that this isn't everyone's priority!
If you are really organised, you can design your gift card card to co-ordinate with your gift card... 1. Size up your gift card
By my reckoning, the average gift card is 86mm x 54mm [3 3/8" x 2 1/8"]. But you may have a special card to give that isn't even a gift card ... such a club membership card that was handprinted by the local club owner's 12-year-old daughter armed with a printer and a laminator. The main aim of this step is to get a general idea of the dimensions of what you are dealing with.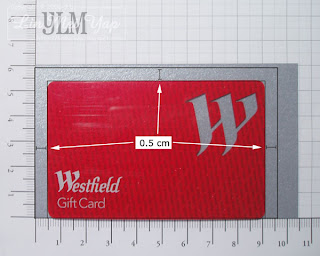 2. Determine the smallest size cardstock required
The great thing about this method is that you really don't have to measure anything but you just have to leave at least approximately 5mm [3/16"] between where the gift card finishes and three edges of your cardstock. The gift card should be flush against the opening which is why you don't have to add a margin to that edge. 3. Clip the gift card to the cardstock
This step is completely optional but I think that it makes things a little easier. I'd recommend you test your clip doesn't leave an unsightly mark if you are not planning on layering something on top of the right side of your backing. Note that the backing is upside down - ie. the opening is on the bottom but will be on the top in the completed project. 4. Apply dimensionals
Cut dimensionals in half and apply them around the gift card as snugly as possible. A snug fit prevents the gift card from moving around. Place dimensionals to support the cardstock where the ones for holding the gift card are too far from the corners. Notice no dimensionals along the opening - obvious but if you follow instructions like me, it's a gotcha!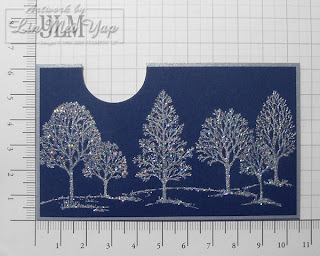 5. Decorate and punch a slot
I mounted my stamped and blinged image onto the backing that I prepared above. Then I used a 1" circle punch to create a semi-circle to make it easier for the recipient to grasp the card out of its holder.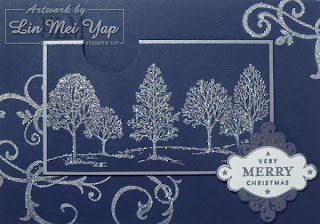 6. Mount onto card
Remove the dimensionals backing and mount the gift card holder on your card. I also added my sentiment to my card at this stage.  7. Insert gift card and secure
This is actually an important step. Nothing holds your gift card in the pocket that you created - so it could slide out quite easily. In my original version of a gift card card, I used a ribbon to hold the card in place. In this more masculine one, I slotted in the gift card and inserted a Designer Brad at the spot shown to keep it secure. And that's it!


