


I can't believe that I haven't been parading my Pretties Kit around. If I could attach a leash to it and take it for a walk, I would! I suppose the fact that it doesn't have legs (or perhaps, more importantly, an animating force) could be a bit of a stumbling block. Then again, I would happily drag it around as long as its tin doesn't get damaged. Perhaps someone would offer to knit the kit a little outfit to protect it from severe gravel rash? Then I'd have a great excuse for some exercise. Walkies, Pretties! Here, Kit-ty!
I made the following card for the June Elite Challenge named "Perfect Rock", a colour challenge set by High Inkantationer Carol (another Carol-link!). The colours forming the challenge were Bashful Blue, Perfect Plum, Purely Pomegranate and River Rock. I'm dedicating the card to my Pretties Kit, from which I used three cream flat backed pearls. Being a hoarder, I'm sure that it hurt me more that my Pretties Kit! 
Stampin' Supplies
Ink:
Bashful Blue
Perfect Plum
Purely Pomegranate
VersaMark
Stamps:
Baroque Motifs set
Cardstock:
Perfect Plum Textured
Purely Pomegranate
River Rock
Whisper White
Accessories:
3/16″ Corner Rounder Punch
Clear Embossing Powder
Cutter Kit Pretties Kit
River Rock Double-Stitched Grosgrain
I've included the close-up on the left for a better view of the embossing and one of the cream pearls. I reckon that the cream pearl tones in well with River Rock but I could be wrong!
Sunday, June 29, 2008
Kit one, pearl three
Saturday, June 28, 2008
Sizing it up
Well, I knew what was a natural consequence of posting the envelope tutorial but, at the same time, I was a little wary as to what would be involved (ie. lots of guesswork and testing the guesses out on unsuspecting pieces of paper or Pythagoras and posting a mathematical formula on this blog). But, what for, you may ask?
I thought that it would be handy for anyone who found the tutorial useful to know how to increase the size of the envelope to accomodate bigger cards. Anyway, after I had created a little mountain of test envelopes (in other words, I gave Pythagoras a wide berth out of laziness...who would have thought that I have a background in science - certainly not me!), I went crying to Hubby and he worked it out in a snap. Thanks Hubby, you're my hero!
Anyway, rather than bore all of you with the details, I've created a table for the conversion. You are welcome to use the formula below if your card is not in the list of measurements, or you need more exact measurements to work from as I've rounded up to make the measurements easier to use. To make the bigger envelopes, you don't have to change anything other than the size of the piece of paper.
Just a few of notes to keep in mind:
1. Always round up when determining the size of the piece of the paper to make sure that your card will fit. Better that the envelope be a little too big than it being too small to fit the card. Am I right or am I right?
2. If your card is particularly bulky, make the envelope square bigger to accomodate.
3. If you are making a batch of envelopes, try one out to make sure that you are happy with the fit.
4. The depth of the notch created by the square punch affects the final size of the envelope so it pays to be precise. At the same time, if I know an envelope size has a little bit of room (from experience), I will punch such that the notch markings are cut off so that I don't have to erase them.
| Card size(cms) | Paper size(cms) | Card size(inches) | Paper size(inches) |
| 7.5 | 12 | 3 | 4 ¾ |
| 9.5 | 14.5 | 3 ¾ | 5 ¾ |
| 10 | 15.5 | 4 | 6 ¼ |
| 12 | 18.5 | 4 ¾ | 7 ¼ |
| 12.5 | 19 | 5 | 7 ½ |
| 13 | 20 | 5 ⅛ | 7 ¾ |
| 15 | 22.5 | 6 | 9 |
Good luck with your envelopes and remember to err on the side of a roomier envelope - after all, most of us know how uncomfortable it is to squeeze into clothes that are too tight!
The formula to calculate the length of the square piece of paper (S) required to house a card of a nominated length (C):
S = C x √2 + k
where:
k = 1 (if measured in cms)
k = ⅜ (if measured in inches)
k is the length of the notch created by the square punch.
Update: Envelope Envies
Have a look at Sue's delicious envelopes made from Stampin' Up! double-sided patterned paper. Great idea, Sue! Everyone else, treat yourselves to an excellent read and beautiful projects while you're there.
For a berry lovely envelope, have a look at Ryemilan's pretty pink creation using Berry Bliss DSP.
Tuesday, June 24, 2008
Posting an envelope tutorial
For those of you eagerly hoping for a tutorial on how to post an envelope, I'm sorry but this post isn't for you. But I'm sure if you asked someone at the post office they'd be willing to help you out for the price of a snicker or two. I know, they can be so mean!
Rather, I'm posting a tutorial on how to make a little envelope to house a 7.5cm square love note (such as these). It is incredibly simple - once you know it, you'll wonder why you ever had to read this tutorial in the first place! 1. Start with a 12cm x 12cm piece of paper. A 5" square would do also.
  2. At the halfway point on each side of the square, mark 0.5cm (3/16") on either side of the midpoint. In other words, for a 12cm square, make a mark at 5.5cm and another at 6.5cm on each side of the square.
 3. Using a square punch, make a notch at each set of markings.
 4. The notched square looks like this.
 5. Use a corner rounder on two diagonally opposite corners (marked in the picture by purple circles).
 6. Score between notches using a bone folder as shown. For the lines closest to rounded corners (marked in red), score exactly along the imaginary line between the apex of the notches.
For the lines closest to the corners which have not been rounded (marked in purple), score just outside of the imaginary line between the apex of the notches. This give a better proportion to the envelope in the end. 7. Fold the corners, that have not been rounded, towards each other along the score lines. Use a bone folder to give a crisp finish.
 8. Apply some glue or SNAIL along the two sides of one of the rounded corners. Fold in along the score line to complete the envelope.
 9. Completed envelope. Now that you know how to make them, you can decorate a square of paper before assembling as you'd get better continuity of patterns across folds.
Easier than posting an envelope, huh? In fact, you may have problems getting Australia Post to accept these envelopes since they are too small. Your best bet would be to give them in person - which, when you think about it, is the only way to deliver a love note.
Saturday, June 21, 2008
Buckle down
June has been very busy so far - perhaps a little too busy. But, as one of my English teachers used to say at the commencement of a test "Heads down, bums up!". Then, a little frisson of scandal would ripple through the class along with "Ah ma! Mrs. M. said "Bum!"". Now that I think about it, it was the worst position in which to complete an exam and I used to come out of them with a sore back. Really felt sorry for the girl behind me too... Oh yes! What I meant to write was that I've buckled down and completed a few things and life is looking a little easier.
Speaking of buckles, I made a formal invitation card with one, so here it is:
Stampin' Supplies
Ink:
Encore Gold
Stamps:
Itty Bitty Backgrounds set
Mostly Flowers set
Cardstock:
Basic Black
Real Red
Whisper White
Accessories:
Antique Brass Hodgepodge Hardware
Black Embossing Powder
Clear Embossing Powder
Heat Gun
Real Red Grosgrain
The buckle on the invitation was created using a Spellbinders Ladies Fashion Buckle die and the faux metal technique. The faux metal technique involves melting a few layers of metallic embossing powder onto a surface and a stamp primed with VersaMark is pressed into the molten surface to create an textured imprint. In the case of this buckle, I used black embossing powder (so it's not really faux metal as such) and when the buckle had cooled, I rubbed the surface lightly onto my Encore Gold pad to highlight the pattern. Followed up with lots of glossy fixative and it is done!
As for the sentiment, I used a Quickutz Party Theme Goosebumpz on Basic Black cardstock and pressed the imprint lightly in Encore Gold and set with matt fixative. Placed everything on top of Whisper White cardstock embossed with a Cuttlebug Diamonds in the Rough folder.
As to the purpose of this card, I'd like to say "You're Invited" to my eScape event! But, in the meantime, have a great weekend and "head up, bum down!". Oooh! I just said "Bum"! *blush* *giggle*
Friday, June 20, 2008
For-gettin' Ma-Stamp-A-Jiggy wit it
Wouldn't you know it? After recommending a Stamp-A-Ma-Jig for first impressions, I left my favourite crutch tool at home during yesterday's Stamp-A-Stack! I woke up on the day of the event a little jiggy and that's when I realised that I had forgotten to pack it. All that nervous energy helped to launch me out of bed - just missed kneecapping a sleeping Hubby on the way out, though.
When I put my Stamp-A-Ma-Jig on the piled up box of workshop materials, I thought I had dodged a bullet and I was feeling real jiggy. But in the mad rush to get everything into the car, it must have slid off the pile. I only discovered this grave omission whilst preparing everyone's place at the craft table - through a slow motion crescendo of panic. It's not in the boxes, not hidden in the files, definitely not in the boxes, not in the car boot, not in the car, not in the pockets (no pockets!), it is really, really not in the boxes! Nooooooooooo!
My friend was very understanding. She offered me two rulers which I attempted to sticky tape together along with two Stampin' Spots to form a decent corner - very sad. *sigh* Anyway, I did the demonstration without the Stamp-A-Ma-Jig and I discovered I can stamp freehand! Woohoo! Sure, it wasn't perfect but that's life (sometimes)! That said, I will never willingly go to a workshop without my Stamp-A-Ma-Jig being packed at the bottom of a pile of stuff.
To celebrate us gettin' jiggy with it, without it, here's Will Smith:
Tuesday, June 17, 2008
Like a pack of wild animal cards
At least I hope my Stamp-A-Stack attendees will! Let me rewind a little. I'm having a Stamp-A-Stack of children's cards at my friend's place very soon and she has invited a few friends who are new to stamping. So, I'm really hoping that they like the pack of cards since first impressions are so important...which, btw, is why I recommend a Stamp-A-Ma-Jig.
These are the first cards that I have designed for children using Stampin' Up! products. I tried tapping into my inner child for an opinion as to whether the cards are appealing to kiddies. Tapping into my inner child is usually not particularly difficult since it tends to sit pretty close to the surface. But this time, it was completely noncommittal and inattentive - probably because I ate some artificially coloured sweets just before asking. Next closest option is Hubby since his inner child also likes to come out to play. His opinion (with my thoughts in parentheses):
giraffe card is awesome (oooooh! very promising)
great colour scheme (hmmmmm...that was a little analytical)
love the layers (oh oh! definitely losing contact with Hubby's inner child)
flawless (Gah! Hubby's inner child has gone back into hiding for sure. So, what does Hubby want?).
I guess it is time for some hypnotic regression. OmmmmMMMMMM...
All of the cards feature the three stamp sets: Circle of Friendship, Sprinkles and Wild About You. Additional Stampin' Supplies
Ink:
Apricot Appeal
Basic Black
Purely Pomegranate
VersaMark
Wild Wasabi
Stamps:
Daisy Field wheel
Floral background
Cardstock:
Apricot Appeal
Groovy Guava
Whisper White
Accessories:
1" and 1 1/4" Circle Punches
Scallop Punch
White Gel Pen
Additional Stampin' Supplies
Ink:
Not Quite Navy
So Saffron
Wild Wasabi
Cardstock:
Blue Bayou
Whisper White
Wild Wasabi
Accessories:
1" Circle Punch
Gold Brads
Mat Pack
Scallop Punch
Stamp-A-Ma-Jig
Additional Stampin' Supplies
Ink:
Brocade Blue
Garden Green
Real Red
Cardstock:
Brocade Blue
Soft Sky
Whisper White
Accessories:
1" Circle Punch
Mat Pack
Real Red Grosgrain
Stamp-A-Ma-Jig
Whisper White Grosgrain
Friday, June 13, 2008
A veek of Carol-link
Da! My Russian is very veak. [Who am I kidding? It is non-existent but I loved the pun on carolling.]
Gee, I can't quite believe that it has been a week since I posted the first challenge from the June INKlings cybercrop hosted by INKantationer Carol. The last of the three challenges, that she had set, was to make a box. I based mine on a pattern that she referenced from Kelly Lunceford. But, since I was too lazy to convert from inches to centimetres and too cheap to cut up a brand new piece of A4 cardstock, I used a couple of large offcuts and modified to suit the size of the scraps. As they say, "Laziness is the mother of invention"...or was that "father"? ... or maybe "necessity"? Da! Vatever!
The pristine white flower is from a Stampin' Up! Pretties Kit and a Chocolate Chip scallop was embossed using a Goosebumpz Flourish die for the corner. Love note envelopes fit perfectly in the box, which is why I've used the same design for eScaping. спасибо Comrade Carol! Stampin' Supplies
Ink:
Chocolate Chip
Stamps:
Scatter Sunshine wheel
Cardstock:
Kraft
Old Olive
Accessories:
Chocolate Chip Grosgrain
Double-Sided Tape
Pretties Kit
Scallop Punch
White Gel Pen
White Grosgrain
Wednesday, June 11, 2008
Adjusting the landscape
I hate my landscape cards.
Hate is such a strong word, I know. What I really mean to say is that I resent my landscape cards. Why? Because when I post them on this blog, the Stampin' Supplies list always exceeds the available space next to the card.
So, to accommodate for the reduced height and width of the supplies list, the first thing I do is delete the first blank line before the supplies heading. List still dangling? Remove the blank lines between supply categories. *scrunch nose at scrunched space* When that isn't enough, I start looking for options to abbreviate:
Grosgrain Ribbon => Grosgrain
Hodgepodge Hardware => Hodgepodge
Cardstock => CS
Background => BG
Designer Series Paper => DSP
Purely Pomegranate Double-Stitched Grosgrain Ribbon => OMSUWHTFM1
I really wasn't thinking straight when I did the second challenge in the INKlings June Cybercrop. In completing a Card Positioning Systems sketch challenge set by Carol, I kinda went to town with the supplies that I used...on a landscape card! Now there is big blank spot at the end of this post. *sigh* On the upside, this is the first outing with my Cuttlebug Shell Collage embossing folder. 
Stampin' Supplies
Ink:
Black StazOn
Certainly Celery
Elegant Eggplant
Purely Pomegranate
Rose Red
Wild Wasabi
Stamps:
Oh So Lovely set
Paisley background
Paper:
Rose Red Prints DSP
Perfect Plum Textured CS
Whisper White CS
Wild Wasabi CS
Accessories:
Crop-A-Dile
Basic Eyelets
Round Tab Punch
Sponge Daubers
White Gel Pen
Wild Wasabi Double-Stitched Grosgrain
1. OMSUWHTFM: Oh my Stampin' Up!, why hast thou forsaken me?
Monday, June 9, 2008
Make love notes not war
Did you ever send letters to those you love and wait in anticipation of its delivery and then a delighted reply in return for the connection that you maintained or re-established? I did...and sadly...was usually disappointed to find out many days/weeks later that while the missive did reach the recipients, they never bothered to let me know. This killed my desire to write letters because I never got the gratification that comes from knowing that the long letters I wrote from Uni were valued. And in the long tradition of abusees becoming abusers, I, in turn, engaged in the awful of practice of hardly ever returning the favour of a letter.
Well, now that I've faced my past, I'm ready to try again - this time without the expectation of a reply. I think that we all chronically busy and one of the greatest gifts that we can bestow to another is evidence that they are worthy of our most precious and continuously dwindling resource - our time. And it would be even more of a gift if we can give this without hoping for reciprocation ... enlightenment, anyone?
The really great thing for me now, though, is that I love making cards. So, by the time the card is put in the mail, I've already gotten something out of it. If the recipient appreciates the connection, all the more wonderful!
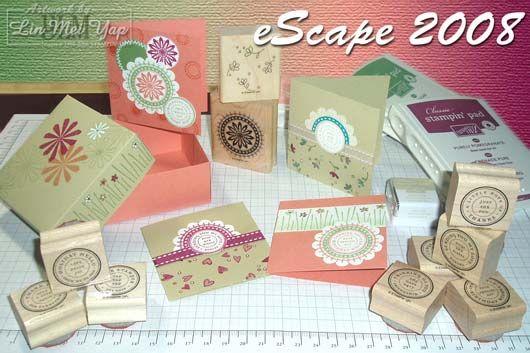
Would you like to try a session in the delightful craft of cardmaking? Make love notes with me on Stampin' Up!'s eScape day, June 25 at my home in Riverwood. I'll demonstrate how to make the cards above and you can play with a range of Stampin' Up! products to make 10 cards and a box custom sized to fit your new creations. And, afterwards, you may be able to bring yourself to give all the love notes away...but at least you'll have the box as a reminder.
The cost for this event is $20 and all materials are provided, as well as a selection of nibbles. Please contact me (call me on (02) 9533 3939 or e-mail me at LMYapStamps@gmail.com) to book as my table only fits 6 guests! I'm suggesting a tentative time of 2:30pm but this is negotiable with the first couple of people interested.
Friday, June 6, 2008
Capture some texture
There's nothing quite like the touch of texture to add interest to life and, more importantly, cards. Ok...so I've exaggerated my priorities a little *grin* I love the feel of clean flannel sheets during winter - the softness of the brushed fibres accompanied by its warm embrace as soon as I slide into bed. Aaahh! Instant comfort! ZZzzzzzz... *hubby nudges me to stop snoring* Doh! I'm awake again - probably a good thing since I haven't finished this post.
I've made the following card for the June INKlings Cybercrop, this time hosted by the Queen of Purple, Carol Dunstan. She posted a colour challenge first and it comprised Basic Black, Brocade Blue, Perfect Plum, Tempting Turquoise and Very Vanilla. I used some Stampin' Up! textured cardstock for the very first time and wonder why I waited so long to do so. Then I remember my tendency to hoard and try to forgive and kick myself simultaneously. It is a rather tricky combination to execute successfully, to be honest.
Stampin' Supplies
Ink:
Basic Black
Brocade Blue
Perfect Plum
Tempting Turquoise
Stamps:
Carte Postale set
Mostly Flowers set
Cardstock:
Basic Black
Brocade Blue
Perfect Plum Textured
Very Vanilla
Accessories:
Pewter Hodgepodge Hardware
Very Vanilla Grosgrain
Don't you think the textured cardstock just adds that something extra? *pssst* Say yes.
What are the textures that you love most? Please share with us in the comments, if you are willing of course!
PS: Many thanks to Marcia for reminding me to indicate that it was a colour challenge! I do hope you get much better soon, Marcia.
Tuesday, June 3, 2008
You're not the emBoss of me!
I've recently been playing around with my heat gun...Don't we all have moments when we point them at our hubbies/partners/passing postmen and yell "Your money or the family jewels get it"? But I'm not talking about that sort of playing. I mean, actually trying to use it for what manufacturers intended - which is heat embossing, of course!
I use the term "trying" in two senses of the word...as in I tried and it was trying. I tried a layer of black UTEE on cardstock after stamping with one of the Mostly Flowers stamp set in VersaMark. When I set the heat gun on it, the UTEE bits started blowing away. The strange thing is you would think that I would turn the heat gun off at this point. But, no. Twenty seconds later, black UTEE all over my work surface, the carpet, on my new pale pink OTT-lite, in my hair, on my hubby (as he reminded me in the comments) and surprisingly very little on the cardstock. I suppose it's not THAT surprising when I take into account how much of the UTEE actually escaped.
The next experiment was with white embossing powder (EP) on dark cardstock. How hard could it be? The first layer was easy... a little patchy but nothing that another layer wouldn't fix. Pour more EP, tap, tap the card and ... tap tap ... tap tap tap TAP. Ack! Time to get out a brush and painstakingly sweep stray grains of EP away. Twenty minutes later. Blast with the gun and bemoan the appearance of black specks of UTEE in what should have been a perfectly white shiny product. Waaaaaaah! *sniffle*
Since the embossing was resisting my best efforts, I decided to try out an emboss resist. Hah! You're not the boss of me, EP!
Stampin' Supplies
Ink:
Cameo Coral
Summer Sun
VersaMark
Stamps:
Artfully Asian set
Itty Bitty Backgrounds set
Mostly Flowers set Cardstock:
Cameo Coral
Summer Sun
Whisper White
Accessories:
Clear Embossing Powder
Heat Gun
Sponge Daubers
Whisper White Grosgrain
White Embossing Powder
Sunday, June 1, 2008
June So Soon
I can't believe how quickly 2008 has gone by, so far. I think it's either that I've had so much fun working on my Stampin' Up! business and there has been so much to do or the older you get, the slower your senses and therefore it just seems like time goes faster - perhaps it is a bit of both...
I remember when every morning at school would drag on and on and, just when it seemed like I could wait no more, it would be morning recess. All the girls would stream out of the classrooms and queue for melted cheese buns which would sell out faster than Guitar Hero III did before Christmas - so you had to get there first unless you had inside connections such as your mum being on tuckshop duty. Another favourite was cream donuts sprinkled with sugar and accompanied by a dollop of jam. Such gourmet delights combined with a bit of shrieking, giggling and running around and the next long wait until lunch would start straight after recess.
Well, it feels like morning recess today! There are two Stampin' Up! promotions which we don't have to wait for ... the first being the eScape bundle (code: cream donuts) and the second being the Extra, Extra Hostess Promotion (code: melted cheese buns). So, check them out as they are great ways to make your next Stampin' Up! experience just that little bit more special.
Unwrapped
 As promised, the Under Wraps competition came to a close on May 31st, 2008 and the revelation...
Congratulations to the two of you who subscribed to my newsletter and e-mailed me with the correct guess of 102283 VersaMark as the item under wraps. I'll be contacting you to find out how you would like to take delivery of your prize.
For those of you who missed out, you are most welcome to subscribe to my mailing list which includes a monthly newsletter detailing the latest Stampin' Up! promotions and featuring whatever useful stamping tips and techniques I can muster. The June edition is in the works.